


Backgammon Cash
Every move, explained
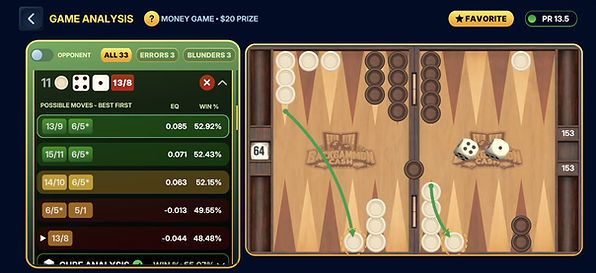
After a match ends, Game Analysis reviews every turn. See the move you made, the engine's recommended move, and how the two compare. You can also switch to your opponent's side to review their decisions.

The goal is simple: understand where you played well, find mistakes you can learn from, and make better decisions in future matches.
Game Analysis is free for every Cash Game. A full report for a Gold Game costs 500 Gold.
What "equity " (EQ) means
Every number on this page comes back to one idea: equity. Equity is what your position is worth right now, measured in points. The engine looks at the board, the cube, and whose turn it is, then asks one question: if this exact position were played out thousands of times by two perfect players, how many points would you win or lose per game on average? That average is your equity.
A way to picture it: Imagine a stranger walks up mid-game and offers to buy your seat. They would take over your checkers, your dice, your cube, everything. What is a fair price for that seat? If you are the favorite, the seat is worth something and they should pay you. If you are the underdog, the seat is a liability and you would have to pay them to take it. Equity is that price. The engine recalculates it after every roll and every move.
Both players start the game at 0.00 equity. The opening position is symmetrical, so neither seat is worth more than the other. From the first roll onward the number moves, and it moves for both players at once: your equity and your opponent's equity always add up to zero. If you are at +0.25, your opponent is at -0.25. There is no move that helps or hurts both of you. Every bit of equity one player gains, the other gives up.
-3.0 EQ
(backgammon loss)
-2.0 EQ
(gammon loss)
-1.0 EQ
(lose)
0.0 EQ
(even)
1.0 EQ
(win)
2.0 EQ
(gammon)
3.0 EQ
(backgammon)
Why it is measured in points and not just win percentage
Backgammon does not have one way to win. It has three, and they pay out differently:

The doubling cube multiplies all of these. With the cube on 2, a single win is 2 points, a gammon is 4, a backgammon is 6. On 4, those become 4, 8, and 12.
This is why equity is not the same thing as your chance of winning. Your win percentage counts every win as one. Equity counts every win by what it pays. A position where you win 55% of the time but a third of those wins are gammons can be worth more than a position where you win 60% of the time with no gammons on the table. The engine weighs each possible outcome by both how likely it is and how much it pays, then adds them up.
Important for Backgammon Cash players. In most cash games on Backgammon Cash, gammons and backgammons do not count unless you are playing a Gammon Game. A win is a win and pays one point, regardless of how many checkers your opponent has borne off. In those games your equity moves in step with your win percentage, and the only ways to change what a point is worth are the stake and the doubling cube. Gammons and backgammons do count in Gammon Games and in points matches (3-point, 5-point, and tournament play). The examples below show both.
Here is the clearest way to see the difference. Suppose on a given turn you have two reasonable plays.

In a Gammon Game or a points match, Move B is the better play by 0.05 even though you win the game less often. You traded a few wins for a real chance at a 2-point result, and the trade pays. If you played Move A, the analysis would show it as a small error.
In a standard cash game where gammons do not count, the 15 gammons are worth nothing extra. Move B is just a play that wins 55% instead of 60%, worth +0.10, and Move A is clearly better. The right move changed because the rules of the game changed, not because the board did. That is why the analysis has to know what kind of game you were playing.
It cuts the other way too. A play that raises your win percentage can still lose equity if it hands your opponent more gammons:

Highest win percentage of the three, lowest equity of the three (in a game where gammons count). A player who only watches the win number thinks Move C is best. The engine knows it is the worst.
How the page grades each move
For every decision in the game, the engine evaluates all of your legal plays and finds the one with the highest equity. That play is the benchmark. Your error on that turn is simply the gap:
Error = equity of the best play − equity of the play you made
If you found the best play, the error is 0.00. If you played something slightly worse, you will get a small negative number such as -0.03. The further the number drops, the more that decision cost you. The page labels the bigger gaps so they are easy to spot:

Two things to keep in mind when reading these numbers:
-
They are normalized for the cube. Every error is shown as if the cube were on 1. A -0.10 blunder reads the same whether the cube was on 1 or on 4. In real points the cost scales with the cube, so a -0.10 error with the cube on 4 actually cost 0.40 points. The normalization is there so you can compare your decisions across games fairly.
-
They are about the decision, not the dice. A move can be the best play and still lose when the next roll goes badly. A move can be a blunder and still win when the next roll bails you out. Equity grades what you controlled. The dice are graded nowhere on this page.
Your total equity lost across the game, divided by the number of decisions, is the basis for your Performance Rating. Lower is better. Zero would be perfect play.
The cube is an equity decision too
Checker plays are not the only thing graded. Every time you had the option to double, and every time you were doubled and had to take or pass, the engine evaluates that choice in the same equity units.
The logic of a take or pass decision is pure points. If you pass, you lose 1 point. That is certain, so passing has an equity of exactly -1.00. If you take, the game continues for 2 points.
At 25% you are exactly indifferent. Above 25%, taking is worth more than -1.00 and you should take. Below it, you should pass. This is where the well-known "take if you can win one game in four" rule comes from. Gammon risk pushes the number up, because some of the games you lose will cost 4 points instead of 2. Owning the cube pushes it down a little, because once you take, only you can redouble, and that right is worth something.
Doubling is the mirror image. The engine checks whether offering the cube raises your equity more than playing on would, and whether your opponent's correct answer is a take or a pass. "No double" when you should have doubled, or doubling too early, shows up as an error just like a checker-play mistake. For many players, cube errors cost more equity over a session than any checker play.
Cash Games versus Points Matches
In a cash game the picture is simple: a point is the stake, the cube can only raise it, and equity multiplied by what a point is worth is what your seat is worth in dollars. In a points match the goal is different. You are trying to reach 3 or 5 points first, not to collect points indefinitely, and that changes what a gammon or a cube turn is worth depending on the score. A gammon that would win you the match is worth far more than a gammon in a game you already lead 4-0.
13/9
6/5*
bar/21
Understanding the moves
Game Analysis uses standard backgammon notation to show how checkers move. Each point is numbered from 1 to 24 from your perspective on the board.
For example, 13/9 means moving a checker from your 13-point to your 9-point. Here are a few other symbols you'll see:
Game Analysis uses standard backgammon notation to show how checkers move. Each point is numbered from 1 to 24 from your perspective on the board.
For example, 13/9 means moving a checker from your 13-point to your 9-point. Here are a few other symbols you'll see:
-
[6/5*] Move a checker from the 6-point to the 5-point and hit an opponent's checker (with a 1).
-
bar/21 Enter a checker from the bar onto the 21-point. (with a 4)
-
7/3(3) Move three checkers from the 7-point to the 3-point. (Double 3's)
-
13/9 6/5* Make two moves in the same turn: one checker from 13 to 9, and another from 6 to 5 to hit an opponent's checker. (with a 4 and a 1)
Once you understand the notation, it's easier to follow the analysis and learn from the recommended moves.
How well did you play?
Your Performance Rating (PR) measures how closely your decisions matched the engine's recommended plays throughout a match. A lower PR is better. A PR of zero means every decision matched the engine's play.
PR looks at your decisions across the game rather than judging you by a single move or result. It helps you track your progress over time and see whether your decisions are improving.

These levels are general guidelines, not strict definitions of a player's ability. The most useful comparison is often your own PR over time.
As you learn from your mistakes and make better decisions, you can work toward lowering your PR.
How much did dice luck affect your game?
Backgammon takes both skill and luck. The dice can have a big impact on an individual match, so Game Analysis measures how your rolls compared with the rolls you could have received in each position.
The engine evaluates the possible dice combinations for each roll and compares your actual roll with the average. Better-than-average rolls raise your luck score, while worse-than-average rolls lower it.
Think about the roll that hits two opposing checkers and turns the game around, or the roll you needed to stay in the game but never got. The luck rating helps put those moments into perspective.
Luck and PR measure different things. PR measures your checker play and doubling cube decisions. Luck measures what the dice gave you. You can play well and still lose because of unlucky rolls, or win a match while making mistakes.
Looking at both helps you understand the difference between how you played and how the dice affected the result. Over many games, good decisions give you more opportunities to come out ahead.
The dice used in Backgammon Cash have been reviewed by the World Backgammon Federation. You can learn more about that review here.
no double
double,take
double,pass
Learn when to use the Doubling Cube
The doubling cube is one of the most important strategic parts of backgammon. Knowing when to offer a double, whether to accept one, and when to pass can have a major impact on the result.
Game Analysis compares your cube decisions with the engine's recommendations. It helps you understand whether you doubled at the right time, accepted when you should have passed, or missed an opportunity to double. The analysis compares three possible decisions:
NO DOUBLE means continue playing at the current stakes
DOUBLE, TAKE means you should offer a double, and your opponent should accept it
DOUBLE, PASS means you should offer a double, and your opponent should not accept it

Each choice has a different effect on the value of the game. The engine evaluates these options to help identify the strongest decision in that position.
Why timing matters. Double too early, and your opponent may accept and gain control of the cube. If the position changes later, they could double you back. Double too late, and your opponent may simply pass when continuing to play could have earned you more.
The right decision depends on the position, your chances of winning, and how the game could develop. Cube Analysis helps you see how your decision compared with the engine's recommendation.
When your opponent declines a double, you win the game at the current cube value. Whether they should accept or pass depends on their chances of winning and the value of continuing to play.
gammonless
gammon games
points matches
Game Analysis adapts to your game mode
Not all backgammon games use the same rules. Game Analysis accounts for the rules of the game you played, so it evaluates your decisions in the right context.
Gammonless analysis. In standard Backgammon Cash money games, gammons and backgammons don't pay extra. That changes which moves are best in certain positions. A move that takes extra risks to win a gammon may not be worthwhile when a gammon pays no extra. A safer move that secures the win may be the better choice. Gammonless analysis is a proprietary analysis engine that no other backgammon engine has, as it was developed by Backgammon Cash and our partners at 5POINT.
Traditional analysis for Gammon Games and Points Matches. In Gammon Games, gammons and backgammons pay extra. The analysis accounts for those possibilities when evaluating moves and doubling cube decisions. A move that increases your chance of winning a gammon can be more valuable, and positions with strong gammon chances can change whether you should double or take a double. Points Matches also use traditional analysis since gammon multipliers are in effect.
Play a game now, then see what the engine saw
Analysis is free on every cash game and costs only 500 Gold to analyze a Gold game. Play a game then open your Game Analysis report and see how you could've shifted the odds in your favor by making better decisions with your Cube and Checker play.